So, you want to learn how to speed up WordPress? A wise decision.
I will show you how in this tutorial.
You’ll be pleased to know most of the steps are really easy to do. You can have a faster website in no time.
Why Website Speed Matters
Slow-loading websites lose visitors.
I don’t want to waste my time and effort to get traffic to my website, only for visitors to leave before they see my content, and I’m guessing you don’t either.
If you care about your audience and want to increase your website’s traffic and visitor retention, follow the steps in this guide and improve your website speed.

Plus, it may help your search engine rankings. Although speeding up your website may not improve your rankings, you could be penalised if your website is slow to load.
How fast should your pages load? Most experts will suggest that 2 seconds or faster is a good target.
That’s why it is so important to optimize your WordPress website.
Are you ready to make your website blazing fast?
Let’s get to the action steps:
How To Speed Up WordPress: Step-By-Step Guide
To help reduce page load time, you can do most of these steps in any order. However, I’ve tried to put them in a sequence that flows nicely for you.
If you’re not going to follow them in order, please complete the first step before moving on to any others. It’s important!
The step that should make the most significant difference to your website speed is to upgrade your hosting to faster WordPress hosting. However, I know not everybody has the budget for this. Therefore, I have started with the steps that are free or have little cost involved.
I’ll perform each of these steps on this site so you can see the kind of results to expect. I’ll also include page speed test results throughout the guide.
Disclosure: Please note that some of the links below are affiliate links. This means that if you decide to make a purchase via one of the links, at no extra cost to you, I will earn a commission. Please understand that there are plenty of places that offer affiliate programs, but I only recommend tools, resources, etc., that I’ve personally used, continue to use, or come from companies/individuals that I trust. I’d never recommend anything I wouldn’t use myself. Integrity is everything to me. If you buy something through one of the links, I am very grateful for your support. Thank you!
-
How to Check Your WordPress Website Speed
- Backup Your WordPress Site
- Upgrade WordPress to the Latest Stable PHP Version
- Keep Your WordPress Site Updated
- Update WordPress Plugins
- Install a Fast, Lightweight WordPress Theme
- Disable Pingbacks and WordPress Trackback Spam
- Install the Perfmatters WordPress Plugin
- Install Essential WordPress Plugins Only
- Optimize Your WordPress Database
- WordPress Image Optimization
- Install a WordPress Caching Plugin
- Lazy Load Your WordPress Content
- Enable GZIP Compression for WordPress
- Optimize Web Fonts in WordPress
- Optimize Icons in WordPress
- Minify CSS, HTML and JavaScript
- Eliminate Render-Blocking JavaScript and CSS
- Concatenate Scripts and CSS in WordPress
- Improve Third-Party Performance on Your WordPress Site
- Disable Remarketing and Advertising in Google Analytics
- Upgrade Your WordPress Hosting – Move to Fast, Secure, Managed WordPress Hosting
- Move to a Premium DNS
- Enable Webmaster Tools via DNS
- Setup a CDN For Your WordPress Site
- Disable Hotlinking of Images in WordPress
- Disable Scripts and Plugins on Specific Pages and Posts in WordPress
How to Check Your WordPress Website Speed
To speed up your WordPress website, you’ll first need to know how fast your pages are currently loading.
Here is a list of some free tools you can use to test the speed and performance of your website. They’ll provide you with a baseline you can reference as your website’s initial speed performance.
They’re all self-explanatory, so I won’t insult your intelligence by telling you how to use them.
Website Speed Test Tools
- Pingdom
- GTMetrix
- Google PageSpeed Insights
- Google Test Your Mobile Website Speed and Performance
- WebPageTest
- Chrome DevTools
- Google Lighthouse
- YSlow
- Load Impact
- Geek Flare Website Speed Test
- KeyCDN Website Speed Test
- Web Page Analyzer
- DareBoost
- dotcom-monitor
- FirstSiteGuide Lookup Tool
Speed Up WordPress Test Results: Pre-Optimization
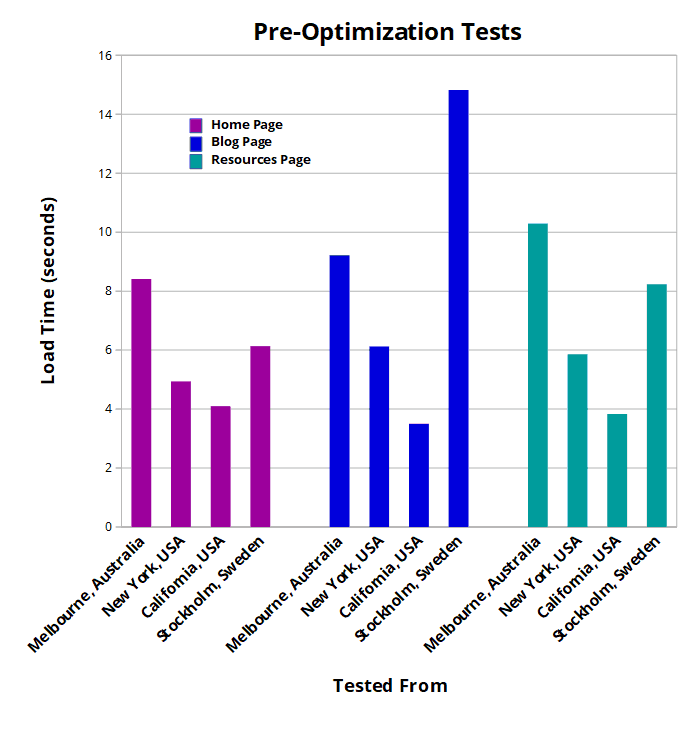
Here are the speed test results for Internet Habits before most of the optimizations in this tutorial were performed. I already had a few optimizations in place, such as GZIP compression, one of the latest versions of PHP and a fast WordPress theme.
I will use the Pingdom Website Speed Test for all the tests in this tutorial. The test will be run 5 times per location, and I will display the result closest to the average of the 5 tests.
Home Page Speed Test Results
(Click for speed test screenshots)
- Melbourne, Australia: 8.41 seconds
- New York, USA: 4.93 seconds
- California, USA: 4.09 seconds
- Stockholm, Sweden: 6.13 seconds
Blog Page Speed Test Results
(Click for speed test screenshots)
- Melbourne, Australia: 9.22 seconds
- New York, USA: 6.12 seconds
- California, USA: 3.50 seconds
- Stockholm, Sweden: 14.82 seconds
Resources Page Speed Test Results
(Click for speed test screenshots)
- Melbourne, Australia: 10.29 seconds
- New York, USA: 5.86 seconds
- California, USA: 3.83 seconds
- Stockholm, Sweden: 8.23 seconds
Now you know this website’s initial speed and performance, let’s see how much we can speed up WordPress.
1. Backup Your WordPress Site
This is the first step you should take before making any modifications to your blog.
Backup your WordPress site just in case you break something on your site. If something goes wrong, you’ll have the peace of mind that you can restore your backup.
A section in my blog setup tutorial shows you how to backup a WordPress blog for free.
Once you have a website backup, you can start with the WordPress speed optimization tips below.
If you have the budget, you can jump to the step that should make the most impact on your page load speed:
Choose one of the best WordPress hosting providers.
2. Upgrade WordPress to the Latest Stable PHP Version
This is probably the easiest performance optimization you’ll make in terms of results versus effort required.
When you upgrade your hosting server to the latest stable version of PHP, you can expect to see a significant reduction in page load time, improved resource efficiency and be able to service more concurrent users.
That’s an impressive performance boost to your site when you consider you’re only changing one thing.
Of course, the actual performance improvements you experience will vary based on your site load, theme, plugins, and cache-ability.

To get started, you need to check the latest stable and supported versions of PHP.
Before you upgrade your PHP version, you need to check that the theme and plugins you’re using are compatible.
Luckily, PHP Compatibility Checker is available. This plugin will scan your plugins and themes for known compatibility issues.
It’s not perfect, but it will certainly give you a good idea of any changes that may be required.
Once you’re happy that your WordPress site is compatible with the latest stable version of PHP, you can proceed with the upgrade. If you discover compatibility issues, upgrade to the latest compatible version.
If you’re using shared WordPress hosting, such as BlueHost or SiteGround, you can update your PHP version via cPanel.
Before you try this, it might be worth contacting their support as they may be happy to do this work for you.
If you’re using managed WordPress hosting, such as Kinsta, I’d be surprised if you’re not already using the latest stable version of PHP. Reach out to their support team, and they’ll soon let you know.
Once that’s done, you’re ready to move on to the changes within your WordPress site itself.
3. Keep Your WordPress Site Updated
You should always update WordPress to the latest version. You can do this via the dashboard updates screen if you’re new to WordPress.

This step won’t always provide speed increases but will help keep your website optimized and secure.
A secure site can prevent malicious code from gaining access and slowing down your website.
A WordPress installation that’s kept up to date will be optimized for developers to write better code for themes and plugins. This will result in a tidier database and faster queries.
You see, WordPress updates may not provide a speed increase by themselves, but they provide indirect benefits.
Plus, major WordPress updates will also ensure your site is optimized to work with the latest version of PHP. You already know the benefits of that if you completed the previous step.
4. Update WordPress Plugins
Plugins can increase the number of HTTP requests your website makes when loading. More requests generally equal slower load times. Poorly coded plugins can also cause performance issues and security leaks.
That’s why it’s important to only install plugins you need and to ensure they are kept up to date.
You can perform plugin updates via the plugins administration screen or the dashboard updates screen.
5. Install a Fast, Lightweight WordPress Theme
The WordPress theme you choose for your blog is a very important decision. It needs to make your website look the part and be secure and well-coded.
Many WordPress themes are bloated and can have a considerable impact on your site speed.
Responsive, lightweight themes, such as GeneratePress or the StudioPress themes powered by the Genesis Framework, have an excellent reputation and are well supported. These are powerful, well-coded themes, and they’re fast.
Once you’ve selected your theme and installed it, don’t forget to keep it up to date.
I go into more detail on how to choose a WordPress theme in my step-by-step tutorial: How To Setup A WordPress Blog.
6. Disable Pingbacks and WordPress Trackback Spam
Pingbacks and trackbacks allow you to see if someone has linked to your content. Although this can be useful, other services can do this without putting a strain on your server resources and slowing down your page speed.
Ahrefs and Google Webmaster Tools can keep track of your site mentions.
To disable pingbacks and trackbacks, go to Settings and then Discussion within your WordPress dashboard.
Once the Discussion Settings page has loaded, make sure there’s no tick in the box for Allow link notifications from other blogs (pingbacks and trackbacks) on new articles.

As the option states, this only applies to new articles. If you want to disable pingbacks and trackbacks on existing WordPress posts, you must use the Bulk Actions option on the Posts page in your WordPress dashboard.
Once you’re on the Posts page:
- Click on the Screen Options button located in the top right corner of the page
- Enter 999 into the box for Number of items per page: and click on the Apply button
The page will reload with all your posts listed. If you have over 999 posts, you’ll have to repeat the next few steps for your remaining posts too.
- Select all posts by checking the box next to the Title label
- Click on the Bulk Actions drop-down and select Edit, then click the Apply button
The Bulk Edit options will now be displayed.
- Click on the Pings drop-down and select Do not allow, then click the Update button

WordPress will now turn off pings on all the posts you selected.
7. Install the Perfmatters WordPress Plugin
Other than a hosting upgrade and WordPress Content Delivery Network (CDN) setup, this is the only step in this tutorial where I recommend you spend some money rather than take the free alternative. It’s only a small cost, but for me, it’s completely worth it. I’m a fan of anything that saves time.
Perfmatters is a lightweight plugin that makes it extremely easy to disable things you may not need on your site. No need to play about with complicated code, with a few clicks you can turn off features that aren’t required that would otherwise slow down your site.
You’ll find a few of these WordPress speed optimizations appear in other tutorials, such as disabling emojis or limiting WordPress post revisions, but not many include all that is possible with this single plugin. That’s the benefit of a plugin developed by two brothers with a love for WordPress, web applications and optimization.
Many of the optimisations this plugin provides come from reduced HTTP requests and page size. The fewer requests, the faster your pages will load.
Gain the edge over your competition with these WordPress “hacks”.
Here are just a few of the web performance optimizations you can make with Perfmatters:
- Disable Emojis
- Remove Query Strings
- Remove jQuery Migrate
- Remove wlwmanifest Link
- Disable RSS Feeds
- Remove RSS Feed Links
- Remove REST API Links
- Disable WooCommerce Scripts
- Disable WooCommerce Cart Fragmentation
- Disable WooCommerce Status Meta Box
- Disable WooCommerce Widgets
- DNS Prefetching
- Script Manager: Disable Scripts Per Page/Post
- Disable Embeds
- Disable XML-RPC
- Hide WP Version
- Remove RSD Link
- Remove Shortlink
- Disable Self Pingbacks
- Disable Dashicons
- Disable Google Maps
- Disable WordPress Heartbeat API
- Change WordPress Heartbeat API Frequency
- Disable or Limit WordPress Post Revisions
- Change WordPress Autosave Interval
- Change WordPress Login URL
I cover the disable scripts feature later in this tutorial.
DNS Prefetching
One optimization I’d like to expand on is DNS Prefetching.
DNS Prefetching tells the browser to perform DNS lookups in the background (idle time, when the user is browsing) and store them in its cache for when they may be needed. If a user clicks on a prefetched link, it will load quicker.
It’s easy to implement DNS Prefetching with Perfmatters.
While most of the optimizations you can do with Perfmatters involve simply enabling the option for that feature, DNS Prefetching requires you to manually enter some information:
- Within your WordPress dashboard, go to Settings and then click on perfmatters
- Once the Perfmatters settings page has loaded, click on the Extras tab
- Type each of the domains you want to prefetch. One per line and don’t include http:// or https://
- Click Save Changes
I suggest that you prefetch domains such as Google Analytics, Google Fonts, and your CDN URL (if you have one. I cover CDNs later in this tutorial)
Of course, you can also do this without a plugin. You need to add some lines of code to the header file of your WordPress site.
Example:
<link rel="dns-prefetch" href="//domain.com">
Remember to replace domain.com with domains you want to prefetch.
To add prefetching for Google Analytics, Google Fonts, Google Code (jQuery), and your CDN URL, you would enter the following code:
<link rel="dns-prefetch" href="//www.google-analytics.com">
<link rel="dns-prefetch" href="//fonts.googleapis.com">
<link rel="dns-prefetch" href="//ajax.googleapis.com">
<link rel="dns-prefetch" href="//cdn.YourDomain.com">
Here is a list of domains used by common services you may wish to include in your DNS Prefetching.
Rather than use a combination of plugins, Perfmatters allows you to perform multiple functions within a single plugin. With fewer plugins installed, there’s less of a security risk to your website.
For those of you who don’t have the budget for this plugin, here are a few free plugins that cover a handful of the optimizations that Perfmatters offers:
Speed Up WordPress Test Results: After Phase #1

Here are the speed test results for Internet Habits following the WordPress speed optimizations so far:
Home Page Speed Test Results
(Click for speed test screenshots)
- Melbourne, Australia: 7.94 seconds — A page speed 5.59% faster than pre-optimization.
- New York, USA: 3.90 seconds — A page speed 20.89% faster than pre-optimization.
- California, USA: 3.55 seconds — A page speed 13.20% faster than pre-optimization.
- Stockholm, Sweden: 5.44 seconds — A page speed 11.26% faster than pre-optimization.
Blog Page Speed Test Results
(Click for speed test screenshots)
- Melbourne, Australia: 6.93 seconds — A page speed 24.84% faster than pre-optimization.
- New York, USA: 4.38 seconds — A page speed 28.43% faster than pre-optimization.
- California, USA: 3.13 seconds — A page speed 10.57% faster than pre-optimization.
- Stockholm, Sweden: 7.06 seconds — A page speed 52.36% faster than pre-optimization.
Resources Page Speed Test Results
(Click for speed test screenshots)
- Melbourne, Australia: 8.52 seconds — A page speed 17.20% faster than pre-optimization.
- New York, USA: 5.04 seconds — A page speed 13.99% faster than pre-optimization.
- California, USA: 3.68 seconds — A page speed 3.92% faster than pre-optimization.
- Stockholm, Sweden: 7.70 seconds — A page speed 6.44% faster than pre-optimization.
8. Install Essential WordPress Plugins Only
Many WordPress speed optimization guides will tell you that installing too many plugins is bad. What they should tell you is not to have too many unnecessary plugins installed.
You see, a lot of plugins is not always a bad thing. You just need to make sure you focus on quality, well-coded plugins that don’t create too much overhead for your web server or too many HTTP requests and database queries.
How do you determine which plugins are causing these issues so you can remove or replace them?
Tools to Test WordPress Performance
The following will help you manage your WordPress plugins effectively:
WP Speedster
Before you install a plugin, you can evaluate it with WP Speedster. It’s a free online tool that has tested over 25,000 free WordPress plugins for speed.
Search for the plugin, check its rating, and use that information to help you decide whether it will have too much of an impact on your site’s speed.
P3 (Plugin Performance Profiler)
The P3 (Plugin Performance Profiler) is a great free plugin you can use to identify problematic plugins that may be slowing down your site’s load time.
Scan your site, and once you have the results, use the information to help you decide which plugins you need to replace.
Note: At the time of writing, this plugin is not compatible with PHP 7 and above.
WordPress Performance Profiler
The WP Performance Profiler is a more advanced, lightweight alternative to the P3 plugin. There’s a small cost involved, but it can help you to:
- Measure plugin performance
- Spot trends in aggregate data
- Detect performance issues
- Optimize your site
Note: This will only work on sites running PHP 5.3 or 5.6. The WP Performance Profiler is not compatible with HHVM or PHP 7.
Query Monitor
Query Monitor is a free debugging and development WordPress plugin.
Although it has more use for developers who work with WordPress, this tool will help you locate the culprit that is preventing your site from humming along as you’d like.
Kinsta has an in-depth tutorial on how to use Query Monitor if you need a helping hand. It’s not the most straightforward of tools.
And finally:
Don’t forget to deactivate and delete the performance plugins once you’re done with them. Remember, the point of this step was to have no unnecessary plugins installed. If you remove them, you make sure they have zero performance impact.
9. Optimize Your WordPress Database
Your WordPress website can slow down if you don’t keep your database optimized. Content such as post revisions, auto-drafts, trashed posts, spam and unapproved comments can all contribute to unnecessary database bloat.
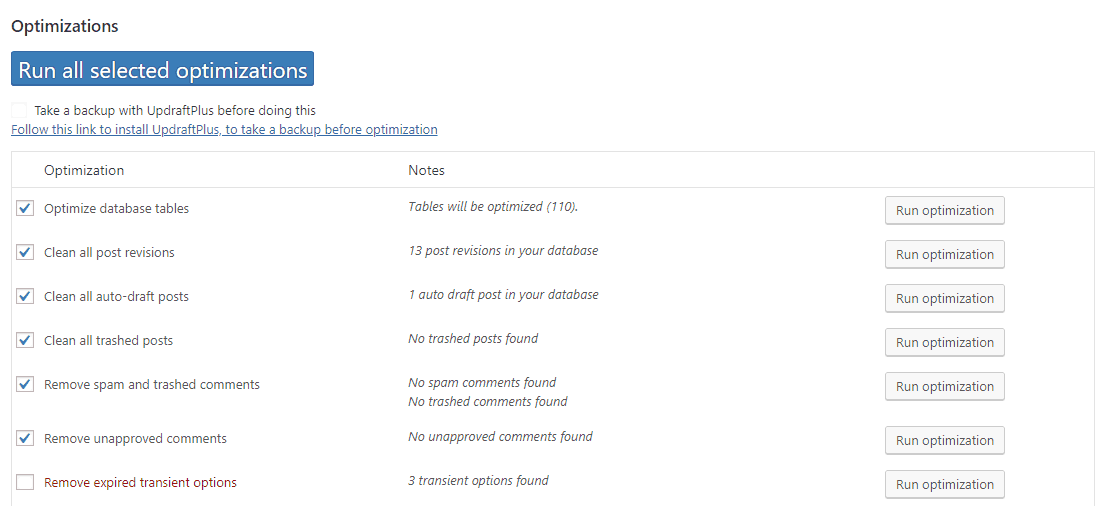
The easiest way to clean up and optimize your database is to temporarily install the free WordPress plugin WP-Optimize.
Go back and read the previous step if you’re wondering why I said: “temporarily install”. I delete the plugin once I have done my database optimizations.
Now, before we go any further, I recommend you backup your WordPress database. I don’t want you to accidentally delete something without having an up-to-date database backup available to restore.
Once you have installed WP-Optimize, select the options you’d like to run and set it going. WP-Optimize will delete everything you’ve selected. It’s as simple as that!
How To Limit or Disable WordPress Post Revisions
Once you have tidied up your database, I recommend you limit the number of post revisions to prevent them from messing up your database further down the line.
I use the Perfmatters plugin mentioned earlier in this tutorial to do this. It allows you to limit or disable post revisions in just a few clicks.
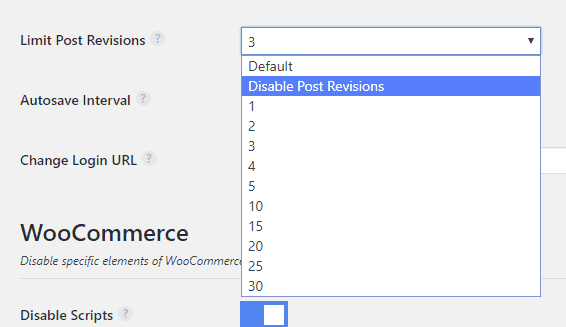
An alternative free plugin that allows you to perform the same task but provides fewer features is Revision Control.
If you’re comfortable with code, you could avoid an additional plugin and add the following to your wp-config.php file:
define( 'WP_POST_REVISIONS', 3 );
In the example, I am limiting the number of post revisions to 3. You can set this to the number of your choice.
Alternatively, you could disable post revisions:
define( 'WP_POST_REVISIONS', false );
Add this code above the ‘ABSPATH’; otherwise, it won’t work.
That’s it. Now, you’ll have a tidier database and a faster website.
10. WordPress Image Optimization
A large percentage of a website’s page weight is made up of images. If your images are not optimized, your website’s pages will be bigger and take longer to load. Larger files also require more bandwidth and storage space, so it makes sense to compress your image files.
The goal with image compression is to find a good balance between small file size and acceptable image quality. You don’t want to sacrifice image quality just to achieve a small file size.
There are two types of compression you can use: lossy and lossless.
Lossy: Lossy compression reduces the file size by removing data. It can degrade the image quality, but when done correctly, lossy compression is almost undetectable.
Lossless: Lossless compression works by compressing the image data. It doesn’t reduce the image quality or file size much but works well for images with few colours.
Just as important as compression is the file format. You want your image to be the correct type before you begin modification and compression.
For those who are unsure, here’s a basic guide to selecting the correct image format:
- JPEG: Use JPEG (or JPG) for images with lots of colour. It can’t preserve transparency.
- PNG: Use PNG for simple images and when you need transparency.
- GIF: Use for simple animated images.
- SVG: Use for graphics and logos, icons, etc.
- WEBP: At the time of writing, this format is not universally supported. Only provide WebP images as a choice for browsers that support it. More on that below.
Once you’re happy with your image, you have a few compression options:
- Online Compression: Tools and programs available to use online
- Offline Compression: Tools and programs installed on your computer
- Automated Compression: WordPress plugins that compress your image when you upload it to your website
- EWWW Image Optimizer
- Imagify Image Optimizer (WP Rocket)
- Optimus Image Optimizer (Key CDN)
- ShortPixel Image Optimizer
- TinyPNG
- WP Smush
You know, I favour anything that helps to save time, so my preference is automated compression.
I use ShortPixel to optimize my images on Internet Habits. It’s my favourite tool from those I’ve tried and has a great set of options. These include a choice of compression type, thumbnail compression, image backup, EXIF tag removal, and the creation of WebP versions of your image.
WebP Images
WebP is a new image format for the web. It provides superior lossy and lossless compression. For a more detailed description, learn about the WebP image format from Google.
If you decide to use ShortPixel like me, once you have the plugin installed, head to the ShortPixel Plugin Settings page and then click on the Advanced tab.
Once there, check the option to Create also WebP versions of the images for free. Remember to click Save Changes once you’re done.
Now, each time you upload an image to your WordPress site, ShortPixel will create a WebP version of that image. To make sure this version of the image is served in supported browsers, I enable a setting in the Cache Enabler plugin. That’s covered in the next step.
Note: WebP images will not be served when logged in to your WordPress website. To view your website with WebP images, using a browser that supports the format, either logout and load your website or open your website via a Private (Incognito) window in your browser.
11. Install a WordPress Caching Plugin
WordPress caching is probably the most popular and fastest way to improve performance. Caching stores your WordPress posts and pages as static files. The static files are then served to your visitors, reducing the processing load on your server.
To take advantage of caching, install a WordPress caching plugin. The best WordPress cache plugins are:
- Cache Enabler: This is my favourite minimal WordPress cache plugin. It’s easy to set up, lightweight and delivers excellent speed improvements. It also works nicely with the other plugins I recommend in this tutorial to speed up WordPress.
- Swift Peformance Lite: This is arguably the best free WordPress cache plugin available. It’s not as simple to use as Cache Enabler, but it’s stacked with many features. They also have a Pro version, which is excellent.
- WP Rocket: This plugin performs well and would be my recommendation if it wasn’t for Cache Enabler. This is the only one of the five cache plugins that isn’t free.
- WP Super Cache: A very simple cache plugin developed by the team at Automattic.
- W3 Total Cache: This is a more advanced cache plugin that requires a lot more configuration than the alternatives.
Note: Once you install and activate a cache plugin, future changes you make to your blog may not appear to be successful. If you experience this problem, clear the cache for your chosen cache plugin.
How To Install and Setup Cache Enabler – WordPress Cache Plugin

We’ll use Cache Enabler for this tutorial because of its simplicity and performance improvements. I also like that it offers WebP support, as mentioned in the previous step, and is fully compatible with the Autoptimize and Async JavaScript plugins. I cover those plugins later in this guide.
To install Cache Enabler:
- Within your WordPress dashboard, go to Plugins and then Add New.
- In the “Search plugins…” box, type in cache enabler. WordPress will search through its plugin directory and display the results.
- Locate the Cache Enabler plugin by KeyCDN and click on the Install Now button.
- Once the installation is complete, click on the Activate button.
- Next, within your WordPress dashboard, go to Settings and then click on Cache Enabler.
- Once the Cache Enabler Settings page has loaded, I recommend that you enable Create an additional cached version for WebP image support.
- Click Save Changes.
There’s no need to enable pre-compression or cache minification due to other optimization methods I recommend in this tutorial.
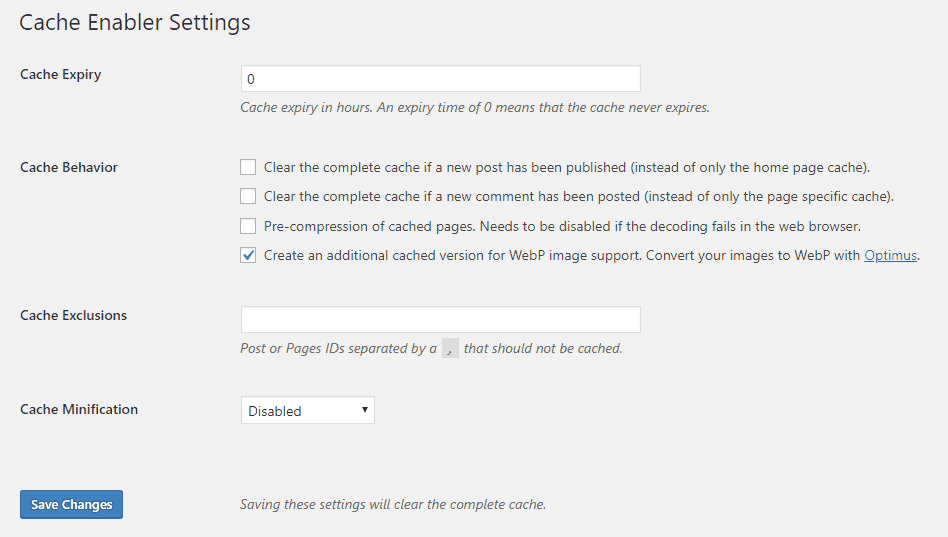
That’s it. You have enabled WordPress caching on your website. You should now have faster loading speeds.
Optional: There’s an advanced configuration for Cache Enabler to bypass PHP for even faster delivery of your static files. If you’re not comfortable with code, you may want to contact your hosting provider’s support team for help with this.
You can also leverage browser caching and server-side caching.
Speed Up WordPress Test Results: After Phase #2

Here are the speed test results for Internet Habits following the WordPress speed optimizations so far:
Home Page Speed Test Results
(Click for speed test screenshots)
- Melbourne, Australia: 5.51 seconds — A page speed 34.48% faster than pre-optimization.
- New York, USA: 4.03 seconds — A page speed 18.26% faster than pre-optimization.
- California, USA: 1.76 seconds — A page speed 56.97% faster than pre-optimization.
- Stockholm, Sweden: 4.31 seconds — A page speed 29.69% faster than pre-optimization.
Note: If you have a good eye, you’ll have spotted that the Internet Habits home page loaded slower in New York following the second phase of updates. I was slightly baffled by this result, but at least you know I’m sharing authentic results with you.
Blog Page Speed Test Results
(Click for speed test screenshots)
- Melbourne, Australia: 6.01 seconds — A page speed 34.82% faster than pre-optimization.
- New York, USA: 3.93 seconds — A page speed 35.78% faster than pre-optimization.
- California, USA: 1.95 seconds — A page speed 44.29% faster than pre-optimization.
- Stockholm, Sweden: 4.59 seconds — A page speed 69.03% faster than pre-optimization.
Resources Page Speed Test Results
(Click for speed test screenshots)
- Melbourne, Australia: 7.08 seconds — A page speed 31.20% faster than pre-optimization.
- New York, USA: 4.76 seconds — A page speed 18.77% faster than pre-optimization.
- California, USA: 2.79 seconds — A page speed 27.15% faster than pre-optimization.
- Stockholm, Sweden: 6.45 seconds — A page speed 21.63% faster than pre-optimization.
12. Lazy Load Your WordPress Content
Lazy loading prevents a browser from loading every asset on a page all at once. Instead, it only loads the visible content and delays the loading of other objects until they are needed, i.e. when you scroll down to view them.
The result? Your site will load pages faster.
Personally, from a user experience point of view, I’m not really a huge fan of lazy loading, so I suggest you test it and stick with your personal preference.
The following plugins can help you lazy load your content:
- Perfmatters: If you followed my advice earlier in this tutorial and installed the Perfmatters WordPress plugin, it has a Lazy Loading feature. There’s no need for you to install an additional plugin to lazy load your images.
- a3 Lazy Load: A popular lazy load plugin that works with your images, video embeds and iframes.
- BJ Lazy Load: This plugin will lazy load your images, gravatars, and iframes.
- Lazy Load: This is a very lightweight lazy load plugin by the team over at WP Rocket. It works on your images, thumbnails, avatars and smilies.
- Lazy Load for Videos: Although BJ Lazy Load works with iframes and, therefore, covers embedded videos from YouTube, Vimeo, etc., you may prefer this plugin for your videos. It replaces embedded videos with a clickable preview image. The video will only load once the user clicks on the preview image.
- Disqus Conditional Load: If you use the Disqus commenting system on your blog, this plugin will allow you to lazy load your comments. Disqus creates a lot of HTTP requests, so the option to prevent these when your blog post is initially loaded should definitely speed up your site. It won’t prevent search engines from crawling your comments, it’s SEO friendly.
Note: Native lazy loading became part of the core version of WordPress with the release of version 5.5. Native lazy loading means that the web browser itself takes charge of lazy loading without the need for a plugin. However, you may find that the plugins are more efficient than the native option. As with many website optimizations, test what works best for your website and stick with that.
13. Enable GZIP Compression for WordPress
GZIP is a file format and application that is used for compression and decompression. It performs best on text-based assets such as HTML, CSS and JavaScript.
Compressing your content will decrease page load times, reduce the load on your server, and save bandwidth. All modern browsers support GZIP compression and will automatically request it.
To check GZIP compression is enabled on your site, input your website address into the free Check GZIP compression tool.
If it reports back that It’s GZIP Enabled, move on to the next step of this tutorial. Your WordPress site already takes advantage of GZIP compression.
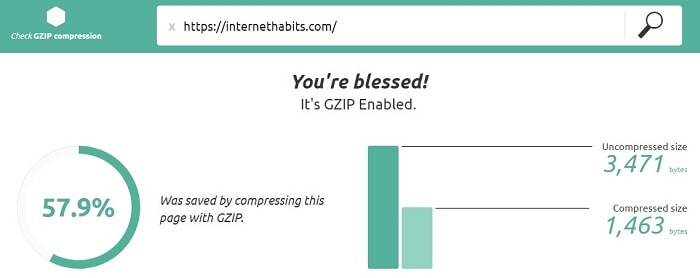
If you were unlucky and the compression tool reports that GZIP is not enabled, you now need to know how to enable GZIP compression for WordPress.
GZIP compression is not handled by WordPress and, therefore, is typically set up through a server configuration file.
How To Enable GZIP Compression on Apache
To enable GZIP compression on an Apache web server (most shared hosting providers use Apache), you will need to add some code to your .htaccess file.
This is reasonably straightforward to do, but if you feel uncomfortable editing configuration files, I recommend contacting your hosting provider’s support team to ask if they will make the change for you.
If you use a quality hosting provider, GZIP compression will likely be enabled by default. If you want to upgrade your WordPress hosting, check out my current hosting provider recommendations. The hosting used by Internet Habits will always be listed on that page.
The easiest way to edit your .htaccess file is via FTP, but you can also use cPanel or another admin interface. The .htaccess file is usually found in the root directory of your WordPress site.
Once you have located the file, copy the following code and add it to your .htaccess file below the text that reads # END WordPress:
<IfModule mod_deflate.c>
  # Compress HTML, CSS, JavaScript, Text, XML and fonts
  AddOutputFilterByType DEFLATE application/javascript
  AddOutputFilterByType DEFLATE application/rss+xml
  AddOutputFilterByType DEFLATE application/vnd.ms-fontobject
  AddOutputFilterByType DEFLATE application/x-font
  AddOutputFilterByType DEFLATE application/x-font-opentype
  AddOutputFilterByType DEFLATE application/x-font-otf
  AddOutputFilterByType DEFLATE application/x-font-truetype
  AddOutputFilterByType DEFLATE application/x-font-ttf
  AddOutputFilterByType DEFLATE application/x-javascript
  AddOutputFilterByType DEFLATE application/xhtml+xml
  AddOutputFilterByType DEFLATE application/xml
  AddOutputFilterByType DEFLATE font/opentype
  AddOutputFilterByType DEFLATE font/otf
  AddOutputFilterByType DEFLATE font/ttf
  AddOutputFilterByType DEFLATE image/svg+xml
  AddOutputFilterByType DEFLATE image/x-icon
  AddOutputFilterByType DEFLATE text/css
  AddOutputFilterByType DEFLATE text/html
  AddOutputFilterByType DEFLATE text/javascript
  AddOutputFilterByType DEFLATE text/plain
  AddOutputFilterByType DEFLATE text/xml

  # Remove browser bugs (only needed for really old browsers)
  BrowserMatch ^Mozilla/4 gzip-only-text/html
  BrowserMatch ^Mozilla/4\.0[678] no-gzip
  BrowserMatch \bMSIE !no-gzip !gzip-only-text/html
  Header append Vary User-Agent
</IfModule>
How To Enable GZIP Compression on Nginx
To enable GZIP compression on an Nginx web server, add the following code to your nginx.conf file:
gzip on;
gzip_comp_level 6;
gzip_disable "MSIE [1-6].(?!.*SV1)";
gzip_min_length 256;
gzip_http_version 1.0;
gzip_proxied any;
gzip_types text/plain text/html text/css application/json application/javascript application/x-javascript text/xml application/xml application/xml+rss text/javascript;
gzip_vary on;
Please refer to the Nginx GZIP Module for more information on the above code.
How To Enable GZIP Compression with a WordPress Plugin
If you decide that you want to enable GZIP compression with a WordPress plugin, first, please check your WordPress cache plugin. If you use any of those mentioned in this tutorial, you’ll find that they either enable GZIP compression or provide the option to switch it on.
If you would prefer a separate plugin for this task, you could try the Check and Enable GZIP compression plugin. Unfortunately, I have never used this plugin, so I can’t recommend it.
I recommend avoiding plugins for this task and enabling GZIP compression on your web server.
14. Optimize Web Fonts in WordPress
I’ll try not to bore you too much with this step.
Web fonts are the fonts your browser has to download from a web server because they’re not already installed on your computer.

There are quite a few font formats available, but nowadays, most modern browsers support the WOFF and WOFF2 formats. I recommend you provide these formats because they have better compression than the others.
Google Fonts tend to perform well because they use a CDN and serve only WOFF formats. However, services such as Adobe Typekit base64 encode all the font formats, which can increase download times and cause your pages to load slower. It also adds additional external HTTP requests, which, as you learned earlier, also decreases your page load speeds.
Most WordPress themes take advantage of web fonts because:
Webfonts are critical to good design, UX, and performance. Ilya Grigorik
Good WordPress themes will also make use of a web-safe font as a backup. Web-safe fonts are those that come pre-installed on your computer. You need a web-safe font available just in case the services of your web font provider go down. Believe it or not, this has happened with Adobe Typekit.
To increase the performance of your website, ideally, you should only serve the fonts you need. More resources are required to provide additional font formats.
If you decide to use Google Fonts to take advantage of their CDN, I recommend you use prefetching to resolve the domain name faster. I covered how to use DNS prefetching in WordPress earlier in this tutorial.
You could also use the Perfmatters plugin to preconnect to Google Fonts.
Migrate Google Fonts to Your Own CDN
To improve your page speed performance further, you could opt to load Google Fonts from your own CDN.
Some benefits of hosting Google Fonts on your CDN:
- Take advantage of a single HTTP/2 connection
- Reduce the number of HTTP requests
- Reduce the number of DNS lookups
- Additional caching control
The team over at KeyCDN have put together a great tutorial that teaches you how to migrate Google Fonts to your own CDN.
15. Optimize Icons in WordPress
The way to optimize your icons in WordPress is very similar to the way you optimize web fonts.
I advise that you either:
- Use open-source hosted icons on a CDN
- Host icons on your CDN
I recommend hosting icons on your CDN to take advantage of fewer DNS lookups.
Of course, if you don’t have your own CDN then use someone else’s if it’s free. Open-source hosted icons on a CDN should always perform better than locally hosted icons without a CDN.
The icons I use on Internet Habits are by Font Awesome. For those of you without your own CDN, they have a CDN that delivers a cached version of their icons to your website.
If you decide to use these icons, they have a tutorial that tells you how to add Font Awesome to your website.
Speed Up WordPress Test Results: After Phase #3

Here are the speed test results for Internet Habits following the WordPress speed optimizations so far:
Home Page Speed Test Results
(Click for speed test screenshots)
- Melbourne, Australia: 5.30 seconds — A page speed 36.98% faster than pre-optimization.
- New York, USA: 3.35 seconds — A page speed 32.05% faster than pre-optimization.
- California, USA: 1.65 seconds — A page speed 59.66% faster than pre-optimization.
- Stockholm, Sweden: 3.75 seconds — A page speed 38.83% faster than pre-optimization.
Blog Page Speed Test Results
(Click for speed test screenshots)
- Melbourne, Australia: 5.74 seconds — A page speed 37.74% faster than pre-optimization.
- New York, USA: 3.07 seconds — A page speed 49.84% faster than pre-optimization.
- California, USA: 1.81 seconds — A page speed 48.29% faster than pre-optimization.
- Stockholm, Sweden: 4.00 seconds — A page speed 73.01% faster than pre-optimization.
Resources Page Speed Test Results
(Click for speed test screenshots)
- Melbourne, Australia: 6.83 seconds — A page speed 33.62% faster than pre-optimization.
- New York, USA: 4.16 seconds — A page speed 29.01% faster than pre-optimization.
- California, USA: 2.60 seconds — A page speed 32.11% faster than pre-optimization.
- Stockholm, Sweden: 5.54 seconds — A page speed 32.69% faster than pre-optimization.
16. Minify CSS, HTML and JavaScript
Minification is the removal of unnecessary characters from your CSS, HTML and JavaScript without changing its functionality.
If you’re interested, the unnecessary characters can include:
- Whitespace characters
- New line characters
- Programmer comments
- Block delimiters
The reason these characters are there in the first place is to improve the readability of the code. They are not required for it to execute.
Why should you minify CSS, HTML and JavaScript in WordPress? To reduce the amount of data requested from the server. With less data to transfer, your load times will be faster.
There are several ways you can minify your WordPress content. Many of the caching plugins mentioned earlier in this tutorial have this option.
However, I’m going to show you how to minify CSS, HTML, and JavaScript in WordPress using Autoptimize. This is my preferred plugin for the job, and it works perfectly with Cache Enabler, my favourite caching plugin.
To install the Autoptimize WordPress plugin:
- Within your WordPress dashboard, go to Plugins and then Add New
- In the “Search plugins…” box, type in autoptimize. WordPress will search through its plugin directory and display the results
- Locate the Autoptimize plugin by Frank Goossens and click on the Install Now button
- Once the installation is complete, click on the Activate button
- Next, within your WordPress dashboard, go to Settings and then click on Autoptimize
- Once the Autoptimize Settings page has loaded, I recommend that you enable:
- Optimize HTML Code
- Optimize JavaScript Code
- Optimize CSS Code
- Click Save Changes
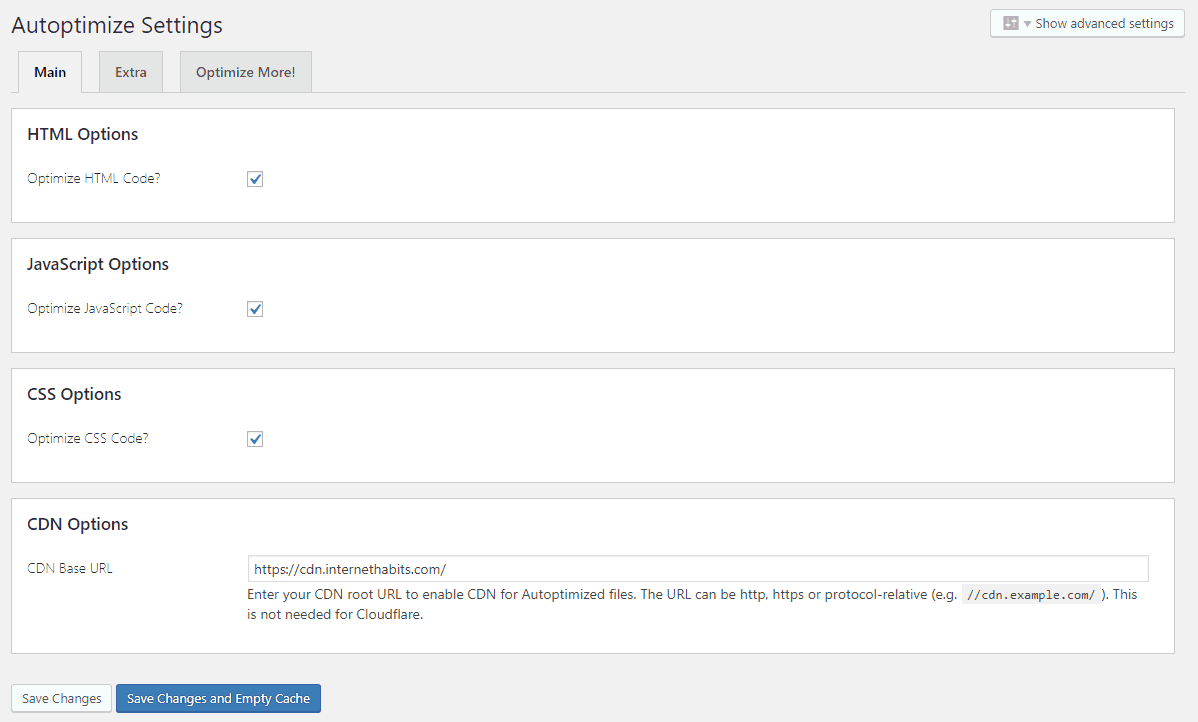
You could also click the option to Show advanced settings and enable:
- Also, aggregate inline CSS
- Enter your CDN URL into the CDN Base URL section (if you have a CDN)
- Save aggregated script/css as static files
- Also, optimize for logged-in users
The options to select will vary from site to site, so these settings may need a little tinkering. You can find more in-depth explanations of the options in the Autoptimize FAQ.
17. Eliminate Render-Blocking JavaScript and CSS
When a web browser tries to load a web page, it analyses the code before it displays anything for the user. During this process, whenever it encounters a resource such as CSS or JavaScript, it has to stop to execute this code. External scripts need to download before they execute, so they delay this process even further.
Therefore, CSS and JavaScript can block the browser from rendering the page. This delays the content from becoming visible to our users.
Now:
Our goal as a website owner should be to load our website content as fast as possible so that our visitors don’t get frustrated and leave. This means we should eliminate render-blocking JavaScript and CSS in above-the-fold content to improve our user experience.
How do we eliminate render-blocking content?
First, you need to understand that not all render-blocking content can be eliminated. Some CSS and JavaScript resources are necessary to render page content.
However, many scripts are not critical to the initial render. These should be made asynchronous or deferred until after the first render.
- Async: The async attribute tells the browser that the script files can be executed asynchronously. This means the HTML parser does not have to pause when it encounters a script to download and execute. Instead, it will execute the script once it’s been downloaded in parallel with the HTML parsing.
- Defer: The defer attribute tells the browser to execute scripts once HTML parsing is complete. As with the async attribute, the scripts can be downloaded during HTML parsing. The difference is that a deferred script is not executed until after parsing has finished.
If we defer or async scripts, our page load speeds will have less of a delay. The result: faster content delivery to our visitors.
So now you know how to eliminate render-blocking JavaScript and CSS. But… should you use async or defer?
Async vs Defer
I’ve done quite a bit of research on this topic and keep finding conflicting answers.
My understanding is:
- You should do nothing to jQuery. Many other JavaScript files depend on jQuery, so you should let it load early. It may remain render-blocking, but that’s ok because it’s more important that everything on your site works.
- You should use defer for scripts you need to execute in the source order.
- Defer should be used for scripts that rely on other scripts or code. A good example is scripts that require jQuery. If scripts that depend on jQuery execute before jQuery loads, they will break. The defer attribute will make sure this does not happen.
- Use async for scripts that are not dependent on other files and can be executed in any order.
- Async should be used if you’re linking to an external JavaScript library.
Of course, if any of your scripts fail to work correctly, you can always exclude them from the async or defer attributes.
How To Eliminate Render-Blocking JavaScript in WordPress
To apply the async or defer attributes to your JavaScript files in WordPress, I recommend you use the free plugin called Async JavaScript.
It’s fully compatible with the Autoptimize plugin used in this tutorial’s previous step.
Note: Some of the caching plugins mentioned earlier in this tutorial, such as Swift Performance and WP Rocket, have the option to add an async or defer attribute to your scripts.
To install the Async JavaScript WordPress plugin:
- Within your WordPress dashboard, go to Plugins and then Add New
- In the “Search plugins…” box, type in async javascript. WordPress will search through its plugin directory and display the results
- Locate the Async JavaScript plugin by Frank Goossens and click on the Install Now button
- Once the installation is complete, click on the Activate button
- Next, within your WordPress dashboard, go to Settings and then click on Async JavaScript
- Once the Welcome to Async JavaScript page has loaded, click the Settings tab. I recommend that you enable the following options:
- Enable Async JavaScript
- Async JavaScript Method: Defer
- jQuery Method: Exclude
- Enable Autoptimize Support (this will only be visible if you already have the Autoptimize plugin installed and activated)
- Click Save Settings
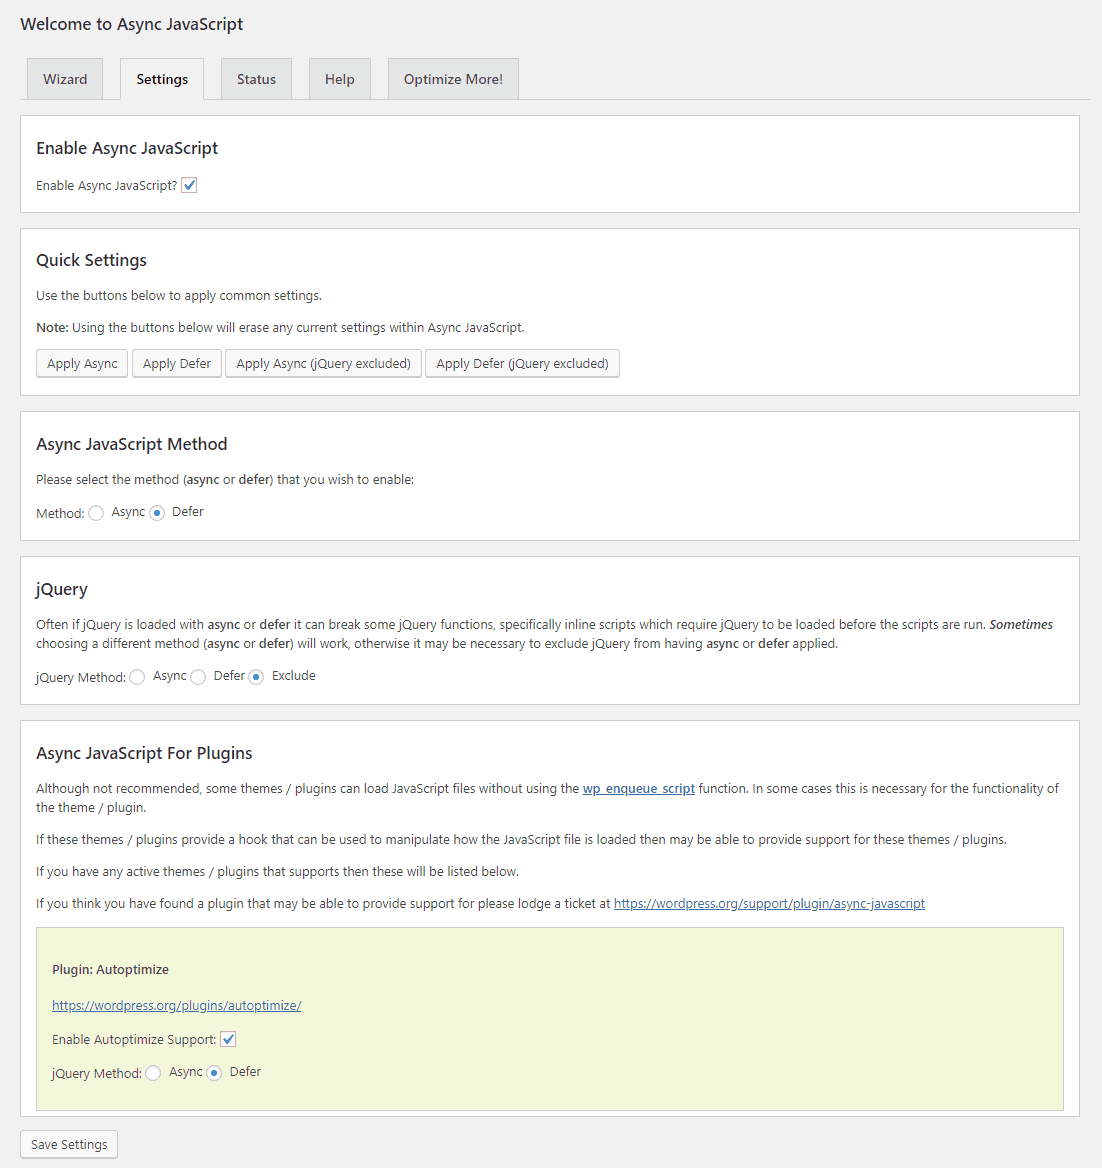
Once you have installed the Async JavaScript plugin and enabled the above settings, list any scripts you would like to apply or exclude from the async attribute. When you have your list, add them to the relevant fields within the plugin settings page and remember to Save Settings.
Now, test your website and check if everything continues to work as expected. If not, you may have to play around with the settings until they work optimally for your website.
18. Concatenate Scripts and CSS in WordPress
Concatenation is combining many files of the same language, such as JavaScript and CSS, into one file. We do this to reduce the number of HTTP requests.
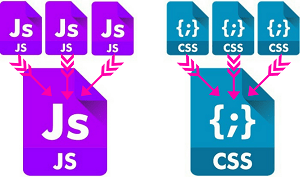
Now, if your website has an SSL Certificate that supports HTTP/2, you may not need to concatenate files. HTTP/2 supports multiplexing, a method which allows the same connection to perform multiple concurrent requests. In other words, HTTP/2 loads more things at once, so reducing the number of requests is no longer an issue.
However, after a lot of testing, some developers have found that concatenation of CSS and JavaScript can still make a lot of sense.
If your site runs on HTTPS, I recommend you test your site with and without concatenation. If your site is not running on HTTPS, you should definitely concatenate CSS and JavaScript.
The easiest way to concatenate your code is with a WordPress plugin. I have some good news if you’ve been following this WordPress speed tutorial step-by-step. You likely already have a suitable plugin installed.
The Autoptimize plugin can be used for concatenation, as can several caching plugins mentioned earlier in this guide.
Simply make sure you have the correct options enabled, and you’re good to go.
19. Improve Third-Party Performance on Your WordPress Site
Third-party services are the tools, systems and networks that we call externally from our WordPress site. Some popular examples would be:
- Social Media Platforms
- Social Sharing Tools
- Website Analytics
- Advertising Networks
- A/B Testing Tools
- CDN Networks
- Chat Bots
- External WordPress Comment Systems
The problem with these services is that you have to wait for them to load. If you use a lot of third-party services, they could add quite a delay to your page load speeds.
To lessen the effect this has on your page load times, you must first identify the third-party services. An easy way to do this is with a website speed test tool such as Pingdom.
Once you run the speed test on your website, you should see a list of resources that were loaded. At the time of writing, Pingdom lists them under the heading ‘File requests’.

If you hover your mouse cursor over each of these files, it should display their location. If the location doesn’t contain your domain name at the start, it’s being called from an external source. Pingdom also lists ‘Content size by domain’ and ‘Request by domain’. If you’re seeing a lot of content and requests from other domains, those files are a good place to start.
When you know the domains with the most content and requests, locate the file requests linked to those domains. Pay particular attention to the length of the coloured bars alongside the files in the ‘File requests’ section. The long bars indicate the total time it took for the request to complete.
With the data available, you should now have an idea of which files are contributing most to your overall load time. You now have to figure out why they’re there, if you need them, and whether you can improve their performance.
If you’re unsure what the files are for, type the domain or file names into a search engine. This should help you identify the associated third-party services.
How To Fix Third-Party Performance Issues in WordPress
To optimize third-party services on your WordPress site, you have a few options:
- Load It Differently: If it’s a script, you could use the async attribute (see the section above on how to fix render-blocking JavaScript in WordPress). If it’s an image, you could load it via a CDN. I touch on CDNs later in this tutorial. You could also lazy load your images, a process that’s also useful for external comment systems.
- Replace It: Items such as social media widgets generate a lot of HTTP requests. A better solution would be to link an icon or banner to your social media pages. Your visitors will need an extra click to follow you, but the trade-off for improved website performance might be worth it.
- Remove It: Do you really need it on your site? If it’s not living up to its intended purpose, get rid of it. You don’t want to clog up your website with things that aren’t providing you with a benefit.
Not All Third-Party Services Impair Performance
Whilst most of this section has been hating on third-party services, it’s important to remember that some services can improve your website performance.
A great example of this is a Content Delivery Network (CDN). Although they appear to add a lot of content and requests to your site, the performance boost they provide is more than worth it. They’re easy to set up on a WordPress site, too. I show you how in a few steps time.
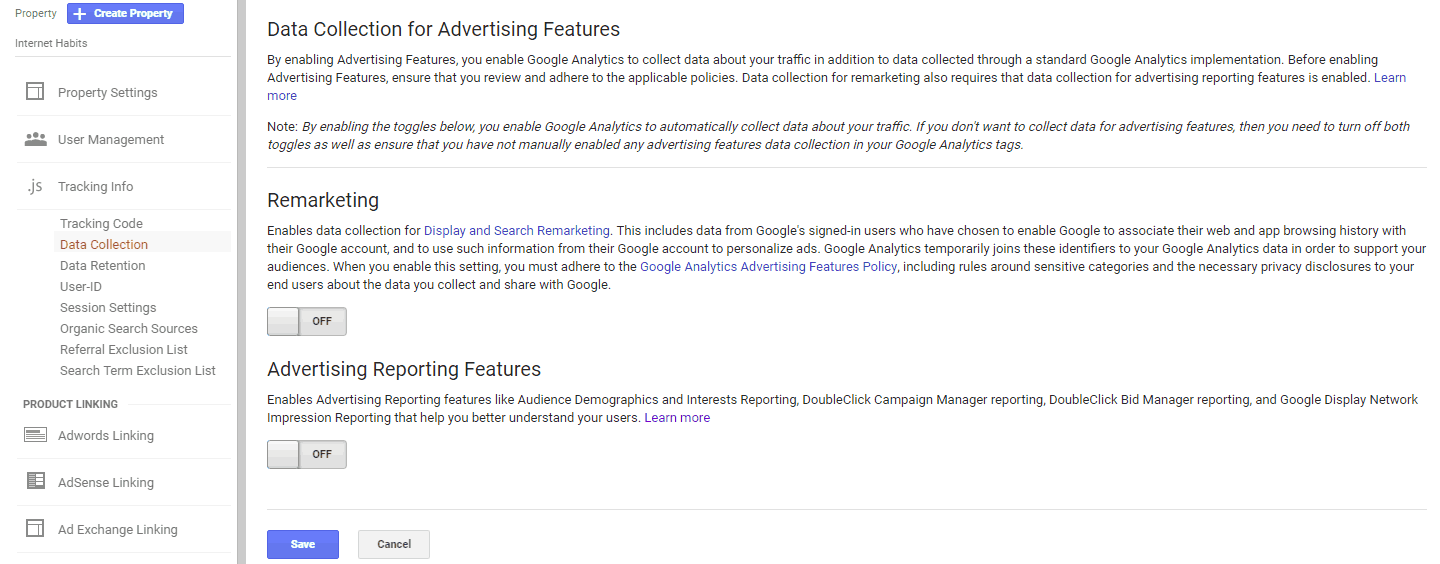
20. Disable Remarketing and Advertising in Google Analytics
If you have no plans to re-engage your website visitors by remarketing to them via ad accounts such as Google Adwords and DoubleClick Bid Manager, then you should turn off these features in your Google Analytics account.
Why?
Because you’ll have one less HTTP request. They all count!
Speed Up WordPress Test Results: After Phase #4

Here are the speed test results for Internet Habits following the WordPress speed optimizations so far:
Home Page Speed Test Results
(Click for speed test screenshots)
- Melbourne, Australia: 3.90 seconds — A page speed 53.63% faster than pre-optimization.
- New York, USA: 1.60 seconds — A page speed 67.55% faster than pre-optimization.
- California, USA: 1.06 seconds — A page speed 74.08% faster than pre-optimization.
- Stockholm, Sweden: 3.17 seconds — A page speed 48.29% faster than pre-optimization.
Blog Page Speed Test Results
(Click for speed test screenshots)
- Melbourne, Australia: 4.36 seconds — A page speed 52.71% faster than pre-optimization.
- New York, USA: 1.51 seconds — A page speed 75.33% faster than pre-optimization.
- California, USA: 1.15 seconds — A page speed 67.14% faster than pre-optimization.
- Stockholm, Sweden: 3.43 seconds — A page speed 76.86% faster than pre-optimization.
Resources Page Speed Test Results
(Click for speed test screenshots)
- Melbourne, Australia: 5.14 seconds — A page speed 50.05% faster than pre-optimization.
- New York, USA: 2.38 seconds — A page speed 59.39% faster than pre-optimization.
- California, USA: 1.53 seconds — A page speed 60.05% faster than pre-optimization.
- Stockholm, Sweden: 4.33 seconds — A page speed 47.39% faster than pre-optimization.
I’m sure you’ll agree that these speeds are quite respectable, considering the website was using cheap shared hosting at this point in the tutorial. This brings us nicely onto the next step to speed up WordPress.
21. Upgrade Your WordPress Hosting – Move to Fast, Secure, Managed WordPress Hosting
Choosing a reliable and fast web hosting provider is one of the most important decisions you can make for your business.
Fast website hosting isn’t cheap, but this is a prime example of how you get what you pay for.
On the subject of money, this is one of the few steps in this WordPress speed tutorial that involves a cost. It’s also likely to be the step that gives your website the most significant performance boost.
The Best WordPress Hosting Providers
If you use a search engine in an attempt to find the best WordPress hosting, your results will probably be sites run by affiliate marketers. More often than not, these websites recommend hosting companies that will earn them the biggest commissions. Although I use affiliate links, you’ll find my recommendations are very different. I recommend based on performance, support, and security.
Although cheap shared hosting is OK when you’re just starting, once performance becomes an issue, you need to move away from overcrowded servers. This is when I highly recommend moving to a Virtual Private Server (VPS) or, better still, managed WordPress hosting.
If you decide on a VPS, it’s recommended that you have some web hosting knowledge because if something goes wrong, it’s down to you to fix it. That’s why I think managed WordPress hosting is the way to go.
Companies that provide managed WordPress hosting offer servers that are fine-tuned specifically for WordPress. They provide help if things go wrong, such as your site goes down or gets hacked. Plus, they’ll also help with further optimizations, like the setup of SSL certificates.

By the way, if you don’t have an SSL certificate for your website, I recommend that you get one. Most hosting providers offer a free Let’s Encrypt SSL nowadays. Regardless of the certificate you have, make sure it supports HTTP/2. Your website will load faster, rank higher in the search engines, and be more secure, thus building trust and credibility.
If you’re serious about your business, upgrade your WordPress hosting.
Affordable Managed WordPress Hosting
If your budget is tight, I recommend SiteGround. Although they’re a cheaper option, they still offer many of the latest features that the high-performance WordPress hosts provide. Some of these include SSD storage, NGINX technology, PHP7+, free Let’s Encrypt SSL, and HTTP/2 enabled servers.
For budget hosting, they consistently score exceptionally well on WordPress hosting performance benchmark tests. They also provide tough security, daily backups and rate highly for their customer support.
Once you outgrow SiteGround and start to get a lot of traffic, you’ll want to invest in a high-performance host.
High-Performance Managed WordPress Hosting
If you have a healthier budget, I highly recommend one of the following options:
WPX Hosting: The most affordable of my recommendations if you need multiple WordPress sites. Unlike many hosting companies that rent their servers, WPX owns servers situated in the world’s largest data centre in Chicago (they have servers located in the UK, too).
As you would expect, their high-spec servers are HTTP/2 enabled and include free Let’s Encrypt SSL certificates, SSD storage, PHP7+ and caching. They’re truly engineered for speed and purposely underload their servers to make sure they perform well under very heavy traffic loads. Oh, and of course, they wouldn’t get my recommendation if they didn’t also provide strong security and fantastic customer support (which is available 24/7/365 with WPX).
Cloudways: If you want high-performance managed WordPress hosting but your budget prevents you from using Kinsta, this is the hosting company for you. Cloudways offers the option to choose a VPS from Digital Ocean, Linode, Vultr, Amazon Web Services, or Google Cloud with their managed support on top. Their focus is on the best possible performance, security and speed.
With HTTP/2 enabled servers, free Let’s Encrypt SSL certificates, SSD Storage, NGINX technology, PHP7+, multi-level caching, and MySQL or MariaDB databases, your WordPress site(s) will fly! They even provide a really affordable CDN add-on that can be integrated with just a few clicks. All that performance, strong security, automated backups, staging environments, expert support and free site migrations. Can you tell I’m a fan?
Kinsta: The ultimate solution when it comes to high-performance managed WordPress hosting. Kinsta utilizes virtual machines powered by Google Cloud Platform, which provides significant speed boosts, automatic scalability and protection via Google’s infrastructure. Due to their vast feature set, it’s easier to list them:
- Google Cloud Network (Premium Tier Network)
- HTTP/2 Support
- Free Let’s Encrypt SSL Certificates to Enable HTTPS
- SSD Storage
- Ubuntu
- PHP 5.6, 7+ Support
- HHVM Support
- NGINX technology
- LXD Containers
- MariaDB fast databases
- Server-Level Caching
- Automatic Scaling
- Free HTTP/2 Powered CDN via KeyCDN
- Free Premium DNS via Amazon Route 53
- Free Staging Environments
- One-Click Site Cloning
- SSH and SFTP Access
- Highly Secure Network
- Automatic Full Daily Backups
- Uptime Monitoring via New Relic
- 24/7 Expert Support
- Free Site Migrations (except the Starter plan)
- Free Hack Fix Guarantee
It goes without saying that Kinsta is my top recommendation for high-performance managed WordPress hosting.
WordPress Hosting Enhancements
No matter who you choose, you should contact your hosting support to ask them to install Google PageSpeed on your server. The PageSpeed modules are open-source server modules that optimize your site automatically. Some hosting providers may not need to perform this install as their default hosting stack may already cover the benefits it provides.
You should also ask your web host to enable Keep-Alive. The HTTP keep-alive response header improves web server performance by keeping a single server connection open across multiple requests to the server, reducing round trips. It won’t have to open as many new connections, so it will use less network and processor power. The result is less load on your server which should help to keep it running fast.
Last but by no means least, check with your host that they leverage browser caching. It will improve page load times for repeat visitors by telling their browsers to reuse previously fetched resources.
Speed Up WordPress Test Results: After Phase #5

Here are the speed test results for Internet Habits following the WordPress speed optimizations so far:
Home Page Speed Test Results
(Click for speed test screenshots)
- Melbourne, Australia: 3.34 seconds — A page speed 60.29% faster than pre-optimization.
- New York, USA: 1.20 seconds — A page speed 75.66% faster than pre-optimization.
- California, USA: 1.14 seconds — A page speed 72.13% faster than pre-optimization.
- Stockholm, Sweden: 1.93 seconds — A page speed 68.52% faster than pre-optimization.
Blog Page Speed Test Results
(Click for speed test screenshots)
- Melbourne, Australia: 3.74 seconds — A page speed 59.44% faster than pre-optimization.
- New York, USA: 1.24 seconds — A page speed 79.74% faster than pre-optimization.
- California, USA: 1.53 seconds — A page speed 56.29% faster than pre-optimization.
- Stockholm, Sweden: 1.97 seconds — A page speed 86.71% faster than pre-optimization.
Resources Page Speed Test Results
(Click for speed test screenshots)
- Melbourne, Australia: 4.06 seconds — A page speed 60.54% faster than pre-optimization.
- New York, USA: 2.39 seconds — A page speed 59.22% faster than pre-optimization.
- California, USA: 1.68 seconds — A page speed 56.14% faster than pre-optimization.
- Stockholm, Sweden: 2.52 seconds — A page speed 69.38% faster than pre-optimization.
If you skipped to this step before performing the others, I’d recommend you now return to the start of this guide and carry out the remaining steps in order.
22. Move to a Premium DNS
In the previous step, you may have noticed that one of Kinsta’s features is a Premium DNS.
To understand the advantages of a premium DNS, you must first understand what a DNS (Domain Name Server) does.
All devices that connect to the Internet have an IP address, including the servers that host websites. These websites are mapped to an IP address so you can visit them. When you type a website address into a browser, it tells your Internet Service Provider (ISP) to request the domain’s IP address from the hierarchy of DNS servers running all over the world. Once the domain’s name server is located, it receives the query and returns the requested IP address. Your browser can now send a request to the website to retrieve the content.
Of course, if your ISP already knows the IP address of the requested website, it will return the answer without having to perform the additional requests.
Without DNS, you would have to type the IP address of the website you require. Can you imagine! Now you’ll understand why some experts refer to DNS as the phone book of the Internet.

So, what are the differences between a free and premium DNS?
Premium DNS providers tend to be more secure, and just like with hosting, there are DNS providers with varying levels of speed.
When you register a domain name, the registrar usually provides a free DNS service. I use NameCheap and GoDaddy to register all my domains, and I’m very happy with both. However, their free DNS services are slow. Ideally, you want a DNS provider with a fast response time.
The DNS providers I recommend are:
CloudFlare: If you need a free solution, CloudFlare’s DNS is a great choice. It’s fast with excellent uptime. Their free plan also gives you access to their global CDN. However, I recommend you use CloudFlare’s free DNS without their CDN because it has a much higher time to first byte (TTFB) than other CDN providers. The CDN providers I recommend are listed later in this tutorial.
DNS Made Easy: If you want one of the fastest DNS providers available, DNS Made Easy are certainly worth checking out. You only have to check out the DNS speed test comparisons at SolveDNS to see how fast they are in relation to the competition.
23. Enable Webmaster Tools via DNS
This step won’t provide you with much of a performance boost but it’s worth doing, nonetheless.
To set up your WordPress website with the various webmaster tools, you need to verify your site. The easiest way to verify your site with Bing Webmaster Tools, Google Search Console, and Yandex Webmaster Tools is to enter the verification meta tags into the Webmaster tools section of Yoast SEO.
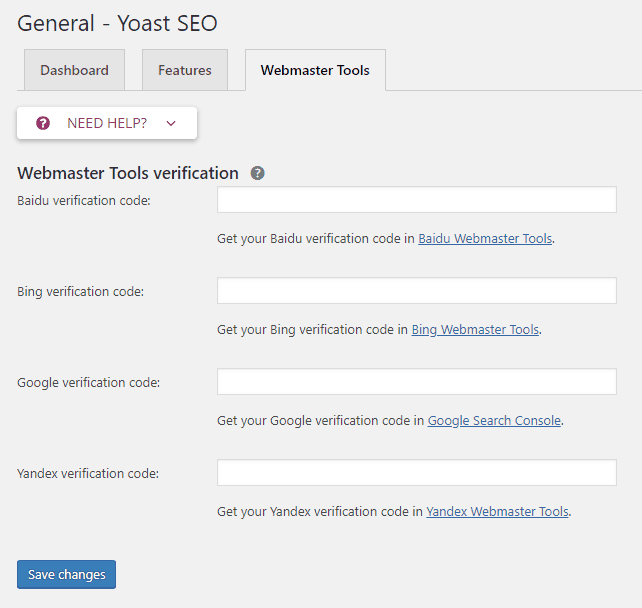
Yoast SEO is a popular SEO plugin for WordPress.
The problem with this method is that it adds a verification meta tag to the header of your site. This is unnecessary code because it’s only needed once for the initial verification and periodic checks. The rest of the time, it’s just code sitting in your header for no reason whatsoever.
A better way to verify your website is with DNS.
Not only will this prevent unnecessary code, but it will also ensure that your site remains verified if you change SEO plugins in the future.
To use DNS for WordPress site verification, you need to login to each of the webmaster tools you want to use and browse to the verify section. Once there, look for the DNS option and follow the provided instructions.
Bing Webmaster Tools requires you to add a CNAME record to your DNS.
Google Search Console needs you to add a TXT record to your DNS configuration.
Yandex Webmaster Tools also requires that you add a TXT record to your DNS.
Once each of the webmaster tools has confirmed that your site is verified via DNS, you can remove the meta tag data from the Webmaster tools section of Yoast SEO.
24. Setup a CDN For Your WordPress Site
This step should give quite a drastic boost to your page load speed. This is especially true for your website visitors who are located a fair distance from your hosting server.
Why?
Because your website data has to travel further to get to them. This is known as latency. Latency is the time and/or delay needed for the transmission of data over a network. The further you are from the data location, the greater the latency and, therefore, the longer it will take for you to receive the data.
How do you fix this?
Unless all your website visitors are conveniently located in the same area, you can’t move your hosting server so it’s close to all of them. However, you can implement a Content Delivery Network (CDN). It will help reduce latency by loading some of your content from servers closer to your users. CDN servers are also known as points of presence (POPs).

What is a CDN?
The clue is in the name. A Content Delivery Network is a network of servers (POPs) located all around the globe. Their job is to host your website’s static files (CSS, images, JavaScript) and deliver them to your visitors from the nearest server. Even if you have high-speed hosting, a CDN will make your site load even faster.
There are several ways a CDN will improve the performance of your WordPress site:
- Decreased latency
- Delivers cached files
- Compressed files using GZIP
- Parallel downloads thanks to HTTP/2 support
- Decreased bandwidth cost and server load
- Serves static content from a cookieless domain
I’ll briefly expand on the last two points, so you understand the benefit. The other points have been covered earlier in this tutorial.
Decreased Bandwidth Cost and Server Load
Let’s say one of your posts goes viral. The additional bandwidth costs could land you a costly bill from your hosting company. But if you use a CDN, your hosting server will not have to deliver all your site content. This would reduce the impact on your hosting resources. Less hosting bandwidth would be needed, leaving you without a pricey bill.
Serves Static Content from a Cookieless Domain
Browser cookies (not the biscuit) are packets of information sent by web servers to web browsers. The web browsers store the cookies and then send the information back to the web server each time the browsers requests a page from that server. They allow websites to keep track of your visits and activity. It usually enhances your online experience.
For example, online retailers use cookies to keep track of the items you add to your shopping cart. Cookies can also remember information you previously entered into a form, such as a name, address, password, etc.

Static files such as CSS, JavaScript and image files have no user interaction, so there is no reason for cookies to accompany them. They would just increase the size of the requested files and cause the web page to load slower.
Serve these static files from a cookieless domain and you reduce file size and improve page speed.
That’s what a CDN can do for you.
How To Set Up A CDN for WordPress
Please don’t be overwhelmed by the thought of setting up a CDN for WordPress. It’s really easy. It’s easier still if you choose to host your website with one of the high-performance WordPress hosts I recommended earlier. They’ll do it for you!
Kinsta provides a free CDN as part of their hosting package, but if your host doesn’t, don’t worry, they’re not that expensive.
The CDN provider I recommend is Bunny.net.
At the time of writing, Bunny.net is quite a bit cheaper than its competition and allows more websites (zones) when getting started. They charge on a pay-as-you-go basis.
Bunny.net is used by Internet Habits. Here’s how you set it up:
Once you’ve signed up for an account with Bunny.net, first you’ll need to create a pull zone. I suggest you follow their tutorial for this step.
When you’ve created your first pull zone:
- Within your WordPress dashboard, go to Plugins and then Add New.
- In the “Search plugins…” box, type in bunny.net. WordPress will search through its plugin directory and display the results.
- Locate the Bunny.net – WordPress CDN Plugin by Bunny.net (it’s free) and click on the Install Now button.
- Once the installation is complete, click on the Activate button.
- Next, within your WordPress menu, click on Bunny.net to open the settings.
- Once the Bunny.net Settings page has loaded, enter your Pull Zone Name (you can find the Pull Zone Name in the Bunny.net dashboard)
- Click the Enable Bunny.net button.
That’s it. Your website now uses a CDN and should load much faster.
However, there are a few additional steps that I’d recommend. They will reduce DNS lookups to improve your website performance and make it appear more professional by using your own branded domain to serve your static content from the CDN.
First, you need to set up a custom CDN hostname. Next, assuming you want to take advantage of the free Let’s Encrypt SLL provided by Bunny.net (you’d be crazy not to unless you have your own SSL certificate), you’ll enable that for your custom CDN hostname.
Instead of your static files loading from yourdomain.b-cdn.net, they’ll load from something like: https://cdn.yourdomain.com
Much better!
To do that, follow these guides in order:
- How To Set Up A Custom CDN Hostname or if you decided to use CloudFlare as your premium DNS (as mentioned above): How To Set Up BunnyCDN With A Custom Hostname on CloudFlare
- How To Set Up SSL For Your Custom Domain Name
- How To Redirect Your b-cdn.net Hostname To Your Custom CDN Hostname Using Edge Rules
You will then want to head back into the Bunny.net – WordPress CDN Plugin and check the settings in the Advanced View.
Note: It may take up to 24 hours for Bunny.net to cache everything and begin to load your images, etc.
If you test your page speed after setting up a CDN, please make sure you run it a couple of times so that your files become cached.
An easy way to check if your files are cached is with Pingdom’s website speed test. If you click on a file served by your CDN listed under the File requests section, X-Cache will show “HIT” if it’s cached. If X-Cache shows as “MISS”, the file is not cached yet.
Speed Up WordPress Test Results: After Phase #6

Here are the speed test results for Internet Habits following the WordPress speed optimizations so far:
Home Page Speed Test Results
(Click for speed test screenshots)
- Melbourne, Australia: 2.12 seconds — A page speed 74.79% faster than pre-optimization.
- New York, USA: 0.841 seconds — A page speed 82.94% faster than pre-optimization.
- California, USA: 0.835 seconds — A page speed 79.58% faster than pre-optimization.
- Stockholm, Sweden: 0.788 seconds — A page speed 87.15% faster than pre-optimization.
Blog Page Speed Test Results
(Click for speed test screenshots)
- Melbourne, Australia: 2.10 seconds — A page speed 77.22% faster than pre-optimization.
- New York, USA: 0.878 seconds — A page speed 85.65% faster than pre-optimization.
- California, USA: 0.751 seconds — A page speed 78.54% faster than pre-optimization.
- Stockholm, Sweden: 0.852 seconds — A page speed 94.25% faster than pre-optimization.
Resources Page Speed Test Results
(Click for speed test screenshots)
- Melbourne, Australia: 2.68 seconds — A page speed 73.96% faster than pre-optimization.
- New York, USA: 1.53 seconds — A page speed 73.89% faster than pre-optimization.
- California, USA: 1.34 seconds — A page speed 65.01% faster than pre-optimization.
- Stockholm, Sweden: 1.40 seconds — A page speed 82.99% faster than pre-optimization.
25. Disable Hotlinking of Images in WordPress
Image hotlinking is when you display an image on your website by linking to it directly from someone else’s website.
You are effectively stealing bandwidth because whenever someone visits your page containing the image, it loads from their server.
I’m sure you wouldn’t like it if someone stole your hosting bandwidth, so please don’t hotlink to another website’s content. Besides, it could slow down your website, especially if the host website is slow. Serve your images from your web server or, better still, a CDN.
Now you know why hotlinking is bad; you probably want to know how to prevent hotlinking on your website. After all, once you disable hotlinking, you prevent the additional load on your server and protect your bandwidth. This doesn’t directly speed up your WordPress site, but it certainly helps to keep it from slowing down.
How To Prevent Image Hotlinking in WordPress
Option 1: .htaccess file
You can prevent hotlinking of your images using .htaccess. You’ll need mod_rewrite enabled on your server to allow this to work. Your web hosting support will be able to help with this.
Paste the following code into your .htaccess file:
RewriteEngine on
RewriteCond %{HTTP_REFERER} !^$
RewriteCond %{HTTP_REFERER} !^http(s)?://(www\.)?mydomain.com/.*$ [NC]
RewriteRule \.(bmp|gif|jpg|jpeg|png|js|css)$ - [F]
Make sure to replace “mydomain.com” with your own website.
The Code Explained:
RewriteEngine on Enables mod_rewrite.
RewriteCond %{HTTP_REFERER} !^$ Allows blank referrers to run through the rewrite. Some Internet users browse under a firewall, which prevents any referrers information. If you disallow them, you block them from accessing your images. The choice is yours, but I recommend you include this line of code.
RewriteCond %{HTTP_REFERER} !^http(s)?://(www\.)?mydomain.com/.*$ [NC] Allows the specified websites to run through the rewrite. Your website should be included here. If you want to allow other websites to link to your images, add additional copies of this line, replacing “mydomain.com” with their website address.
RewriteRule \.(bmp|gif|jpg|jpeg|png|js|css)$ - [F] Blocks hotlinking to the the file types between the (). In the code above, images, JavaScript (js) and CSS (css) have had hotlinking disabled.
Option 2: Enable hotlink protection on your CDN
If you have a CDN, you need not mess around with code. They provide a much easier way to prevent hotlinking.
This guide will show you how to enable hotlink protection with Bunny.net.
Hosting providers that supply a CDN as part of their package will probably do this step for you.
26. Disable Scripts and Plugins on Specific Pages and Posts in WordPress
Once you have completed the WordPress optimizations above, the final change I suggest you make is to disable scripts on certain pages and posts. You can do the same for CSS.
If you’ve followed all the steps above, your pages should load pretty fast. But why stop there when you can squeeze out a little more speed?
You will probably have plugins installed on your WordPress site that include scripts and styles that run on every page. Many of these will be unnecessary, so you should set them only to execute when required.
The popular WordPress plugin, Contact Form 7, is a great example. It loads its script on every page, even if you haven’t added a form to that page. Now, I don’t know about you, but I certainly don’t want my pages to load slowly thanks to plugins that aren’t even needed on those pages.
The solution is to disable plugins on specific pages.
As mentioned earlier in this tutorial, the Perfmatters plugin has a Script Manager. It plays nicely alongside plugins such as Cache Enabler and Autoptimize, so it’s the ideal addition to your WordPress site.
Perfmatters’ Script Manager is a very powerful feature that can drastically increase the speed of your WordPress site.
How To Disable Scripts in WordPress
Your first step is to install Perfmatters, the lightweight WordPress performance plugin.
Once you have the plugin installed, activate it and navigate to its settings page.
To use the Script Manager feature, you first have to enable it. You do this via the “Extras” tab.
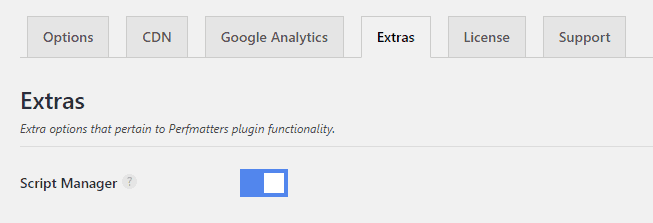
Once you’re on the Extras tab, click the switch to turn on Script Manager and remember to click Save Changes. You can now disable CSS and JavaScript files on a page-by-page basis.
After you enable Script Manager, you need to browse to a page or post that you think will benefit from its functionality. The best place to start will likely be your homepage.
Once you are on the page or post you want to optimize, click on Script Manager, located in the WordPress admin toolbar at the top of your web page.

Note: If you have your WordPress admin bar hidden, you can access Script Manager by adding ?perfmatters to the end of your URL. For example:
If you are working on your homepage:
https://yourdomain.com/?perfmatters
If you are working on your blog page:
https://yourdomain.com/blog/?perfmatters
You should now see the Perfmatters Script Manager page. It will list all the JavaScript and CSS that loads on your selected page or post.
Each item has three options:
- Enabled: The script or CSS will load as normal on that page or post.
- Everywhere: The script or CSS will be disabled for your entire website. You get the additional option to choose if you want to enable it for posts, pages, custom post types and the current URL.
- Current URL: The script or CSS will be disabled for the current URL only.
Your next task is to set the appropriate option for each item. If you’re unsure about a particular file, click on its path to see if the source code makes it more obvious. Failing that, type it into a search engine. This should help you identify what the file does.
Once you are done modifying the settings, remember to click Save.
Finally, head to Pingdom’s Website Speed Test to check if the scripts no longer load on your page or post. Don’t forget to clear your cache first and run the test a couple of times to allow the new cache to populate.
That’s it. Your page or post should now only load the bare essentials. There will be no extras to increase the load time. Do this across your other posts and pages, and you will have one very optimized website.
Speed Up WordPress Test Results
Below, you can see a chart that compares the load speed of various pages from this website both before and after the WordPress optimizations.
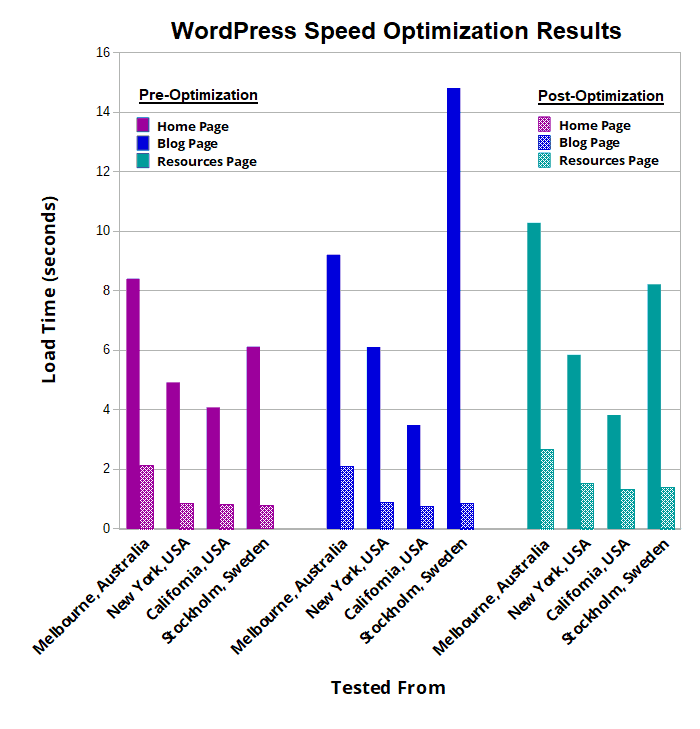
Frustratingly, some external scripts I use on Internet Habits received an update before I could finish the final optimizations. This meant that any further speed tests would not show a true reflection of the work that was performed. Therefore, I have only presented the results up to the inclusion of a Content Delivery Network (CDN). I suspect the page load speed test results would have been a few milliseconds faster for each page once all unnecessary plugins and scripts were disabled.
Lesson learned… things won’t always go to plan when you don’t have complete control of everything.

Summary of WordPress Speed Optimization Results
After completing each WordPress performance optimization listed in this guide, I was able to achieve a website page speed up to 94% faster than pre-optimization! If you take all speed tests into account, the average site page speed was over 80% faster.
The average page load time for the Internet Habits home page across four different locations was 5.89 seconds before I completed any WordPress performance tuning. This dropped to an average of just 1.15 seconds after following this WordPress speed guide.
In fact, after completing each of the steps in this guide all pages were able to achieve an average load time of less than the experts suggested target of 2 seconds or faster. I was able to decrease my page size and the number of HTTP requests by over 50% on each page, too.
The below table shows the average for each of the results from the four different test locations:
| Internet Habits Home Page | Internet Habits Blog Page | Internet Habits Resources Page | ||||
|---|---|---|---|---|---|---|
| TESTS | Before | After | Before | After | Before | After |
| Load Time | 5.89 s | 1.15 s | 8.42 s | 1.15 s | 7.05 s | 1.74 s |
| Page Size | 2.2 MB | 872.6 kB | 2.1 MB | 768.6 kB | 1.9 MB | 859.0 kB |
| Requests | 164 | 76 | 191 | 66 | 195 | 94 |
Conclusion
Nowadays, it’s extremely important to optimize your site for speed and performance.
It’s something you can do right away, and it will help with conversion optimization. When your site loads faster, you improve user experience, which leads to happier visitors. Happy visitors are more likely to stay on your website. This helps to reduce the bounce rate and increase the conversion rate.
The end results? You have a faster website and make more sales.
Most of the steps in this guide are easy to do, so if you haven’t already, please give them a try. And don’t forget to test your page speed before and after, too. It might surprise you just how much you can speed up WordPress.
I hope this tutorial helps improve your page speed. If it does, it would be great to hear your results. Feel free to share them in the comment section below or even tweet me:
Did I miss an important speed optimization? Do you have a trick to add to this list? If so, please share in the comments below. I’d love to hear it. Plus, I might test it and then credit you for the tip!
Finally, if you found this guide helpful, please share it with your friends and followers.
I appreciate your support!
Image Credit(s): imgflip, Colin Viebrock via PHP.net, Kanoha via Wikipedia, imgflip, Steve Burge via OSTraining, imgflip

